Anonymous

Head Rebuild or not?

Here’s where to discuss anything specific about your standard(ish) car or something that applies to the model in general.
Post Reply
trekcarbonboy
Swagester
Posts: 940
Joined: 18 Oct 2010 15:38
Location: USA

Head Rebuild or not?

Postby trekcarbonboy » 14 Feb 2014 19:38

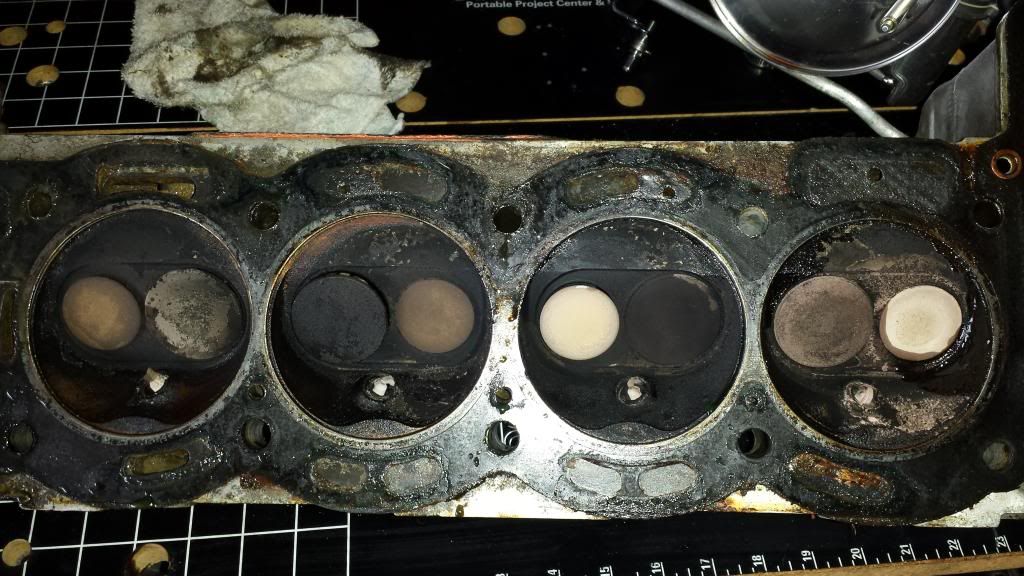
So I am debating weather or not to have my head rebuilt. I think I am going to have it skimmed. It doesn't appear to be warped but one of the walls between 2 cylinders seems a tiny bit high.

<b>So how do I determine if I should bother with replacing or resurfacing the valves and seats or guides?</b> Would it at least behoove me to replace the guides?

I'd certainly like knowing that it's done but I don't want to be wasting money where I don't have to.


Image

Craig '75 2.0 FHC
ImageImage

Workshop Help
TRiffic
Posts: 1891
Joined: 27 Feb 2007 23:52
Location: Worldwide

Postby Workshop Help » 14 Feb 2014 20:49

Dear friend, Craig, it is most certainly not wasting money to have the cylinder head done right the first time. Please, have the head completely overhauled by the best and probably the most expensive racing engine machine shop in your area. Do replace the valves, valve guides, the springs, the keepers, the bucket followers, and the core plugs. Do it all. The money spent will return the investment over the long haul.

Also, use the best head gasket you can find. Plan on the exhaust port holes being retapped and heli-coiled. Have them set the valve lash. If they know how, have the intake and exhaust tracts smoothed out to improve flow. You will sleep better each and every night, hereafter.

Don't forget to use Grade 8 headbolts in place of the five studs along the top.

Mildred Hargis

Hasbeen
TRemendous
Posts: 6474
Joined: 28 Apr 2005 12:32
Location: Australia
Contact:

Postby Hasbeen » 14 Feb 2014 20:52

I presume you are going to at least lap the valves. What the seats & valve faces look like should tell you if you need to cut or replace the seats.

How deeply the valves sit in the seats will give you an indication, but this is mostly about performance rather than reliability. The deeper the valve sits the less gas gets in & the lower the power.

The valves depend on how thin they are at the edge of the seating face. If they get very thin they will then get hotter, which leads to failure.

Once you have cleaned everything up you should be able to feel if there is much slop in the guides when the valve is open about 3/8". It is a road car, not a F1, so a little is OK.

To test how good things are after lapping, set the head up flat, with the valves just sitting in the head, no springs, & fill the combustion chambers with petrol. If more than just a little leaks out in a minute, it's not good enough.

Check the cam followers are not too worn. They wear at the top & bottom, giving a barrel shape. Replace if too sloppy.

Hasbeen

PS. My 7 picked up quite a bit of power from a head rebuild.

H

Workshop Help
TRiffic
Posts: 1891
Joined: 27 Feb 2007 23:52
Location: Worldwide

Postby Workshop Help » 14 Feb 2014 20:59

And, another thing or two. How many miles are on the engine? Pull the oil pan and inspect the condition of the rod & main bearings. More than likely the veneers will be wiped to a certain extent. This is a good time to, (at a minimum), reshell the rods & mains with super high quality bearings such as Vandervell or Glacier. If the crank journal surfaces are not scored or damaged, a reshell may be a good option. It was on mine. This is also a good time to replace the oil pump.

That said, I knew full well the oil change routine on my engine and was able to prevent unknown elements and oils from being a damaging factor during it's service life. Now, after 50,000 miles plus, the reshelled crank continues to perform quietly and display proper oil pressure.

In any event, do perform a plasti-gauge test on the journals.

Then there is the rods and pistons/rings. Have your rods resized at the machine shop. Check the cylinder bore for concentricy and, if all is within tolerances, install a new set of quality rings. If not, rebore to the next size with a new piston set. Follow the factory service manual settings for the ring gap. Note, try and keep the ring gap on the tighter side to increase the cylinder compression pressure.

Mildred Hargis

trekcarbonboy
Swagester
Posts: 940
Joined: 18 Oct 2010 15:38
Location: USA

Postby trekcarbonboy » 14 Feb 2014 23:16

<blockquote id="quote"><font size="1" face="Century Gothic, Verdana, Arial, Helvetica" id="quote">quote:<hr height="1" noshade id="quote"><i>Originally posted by Mildred</i>

And, another thing or two. How many miles are on the engine? Pull the oil pan and inspect the condition of the rod & main bearings. More than likely the veneers will be wiped to a certain extent. This is a good time to, (at a minimum), reshell the rods & mains with super high quality bearings such as Vandervell or Glacier. If the crank journal surfaces are not scored or damaged, a reshell may be a good option. It was on mine. This is also a good time to replace the oil pump.

That said, I knew full well the oil change routine on my engine and was able to prevent unknown elements and oils from being a damaging factor during it's service life. Now, after 50,000 miles plus, the reshelled crank continues to perform quietly and display proper oil pressure.

In any event, do perform a plasti-gauge test on the journals.

Then there is the rods and pistons/rings. Have your rods resized at the machine shop. Check the cylinder bore for concentricy and, if all is within tolerances, install a new set of quality rings. If not, rebore to the next size with a new piston set. Follow the factory service manual settings for the ring gap. Note, try and keep the ring gap on the tighter side to increase the cylinder compression pressure.

Mildred Hargis


<hr height="1" noshade id="quote"></font id="quote"></blockquote id="quote">
Oh good lord Mildred! I'm trying to keep this simple. [;)]
But thanks for the head advice.

Craig '75 2.0 FHC

ImageImage

FI Spyder
TRemendous
Posts: 8920
Joined: 03 Jul 2006 19:54
Location: Canada

Postby FI Spyder » 14 Feb 2014 23:31

<blockquote id="quote"><font size="1" face="Century Gothic, Verdana, Arial, Helvetica" id="quote">quote:<hr height="1" noshade id="quote"><i>Originally posted by trekcarbonboy</i>


Oh good lord Mildred! I'm trying to keep this simple. [;)]
But thanks for the head advice.
<hr height="1" noshade id="quote"></font id="quote"></blockquote id="quote">

Easy for her to say.[:p][:D]


- - -TR7 Spider - - - 1978 Spitfire- - - - 1976 Spitfire - - 1988 Tercel 4X4 - Kali on Integra - 1991 Integra - Yellow TCT
Image

Workshop Help
TRiffic
Posts: 1891
Joined: 27 Feb 2007 23:52
Location: Worldwide

Postby Workshop Help » 14 Feb 2014 23:33

Craig, darling! I fully understand the whole 'bend the nickle till the buffalo poops' concept as I have practiced that philosophy since Christ was a PFC. But, this ain't the time to trot on down the cheap route.

You've successfully jerked the head off, that deserves praise in and of itself. The hard part is over, pulling the oil pan is easy. All it requires is to lift the block about 2-3 inches, as I recall, to access the lower end. The block can stay in place without removing it to the bench. Yes, you will also need to put the car up on cinder blocks to get under there. I did it in early September of 2004, you can and need to do it, too.

Trust me on this one.

Mildred Hargis

Workshop Help
TRiffic
Posts: 1891
Joined: 27 Feb 2007 23:52
Location: Worldwide

Postby Workshop Help » 14 Feb 2014 23:58

Caleb and Abner said it would be a good idea to explain the technique for an in situ lower end overhaul.

Here goes.

In September 2004 at 114,000 miles, the upper ring in #4 cylinder broke. After the head was removed, the car was elevated onto four cinder blocks to give access under the car. What we call a 'come-along' was attached to the reinforced rafter of the machine shed and to lifting eye on the front of the block. The starter was removed along with the metal fan shroud, and motor mounts detached. The 'come-along' then lifted the block about 2-3 inches giving clearance to remove the oil pan.

With the pan off, the rods were detached from the crank enabling the pistons to be removed. Next came the main bearings. Each was pulled for examination which revealed the bearing shell veneers had worn away. The two end main bearing caps were left loosely in place to support the crank.

With the crank slightly sagging and using a wooden Popsicle stick, the top bearing shell was pushed around the crank journal to get it out. Then, later was used to install the new bearing shell by pushing it up into place. Then the shell caps were torqued into place. A healthy dab of white reassembly grease was applied prior to all pieces as they went back on.

This in a nut shell is how it was done for the lower end. It was all straight forward basic mechanic work, all done lying on one's back under the engine.

Mildred Hargis

trekcarbonboy
Swagester
Posts: 940
Joined: 18 Oct 2010 15:38
Location: USA

Postby trekcarbonboy » 15 Feb 2014 00:34

<blockquote id="quote"><font size="1" face="Century Gothic, Verdana, Arial, Helvetica" id="quote">quote:<hr height="1" noshade id="quote"><i>Originally posted by Mildred</i>

Craig, darling! I fully understand the whole 'bend the nickle till the buffalo poops' concept as I have practiced that philosophy since Christ was a PFC. But, this ain't the time to trot on down the cheap route.

Mildred Hargis
<hr height="1" noshade id="quote"></font id="quote"></blockquote id="quote">

I'm not "cheap" Mildred. I just don't have the funds (or desire) available for such an endeavor. My office has been closed 4 of the last 10 working days due to snow and I have an infant and 4 year old at home. I'm already squeezing the coffers to accomplish this original task that was only supposed to be a head gasket replacement.
Thanks for your suggestions though.

Craig '75 2.0 FHC
ImageImage

Workshop Help
TRiffic
Posts: 1891
Joined: 27 Feb 2007 23:52
Location: Worldwide

Postby Workshop Help » 15 Feb 2014 01:42

No offense intended. And you know how I am in finding 'cheap' and effective ways to keep these cars going. Just today, I was out in the machine shed repairing the broken brown wire from the alternator to the battery. Was this a check book repair? Was any money spent today? Nope!

I just hate to see an important chore only half done. Is there any way you can postpone the overhaul until the money and time is in your favor? I've done that too. It's always a pain when real life gets in the way of our hobby time. The truth be told, I'm a bit hard pressed now too, and hoping the tires on another car around here can hold out for another 2 months. It sure would be nice to have been born with a silver spoon in my mouth instead of stainless steel.

Mildred Hargis

Post Reply

Who is online

Users browsing this forum: No registered users and 37 guests