Anonymous

Cracks

The all purpose forum for any TR7/8 related topics.
kstrutt1
Wedge Pilot
Posts: 299
Joined: 15 Jan 2010 14:34
Location:
Contact:

Cracks

Postby kstrutt1 » 08 Jan 2019 18:58

Went to carry out the simple task of changing the carpets on my V8 at the weekend only to find 2 6" long cracks in the rear bulkead on the lhs where the rear trailing arms mount.

So obviously this needs repairing, plan is to cut the bottom 3" of the bulkhead and rear 3" of the floor out then replace it all with fresh 1.5mm gauge steel seam welded in place and then weld the remainder of the crack up. The question is should I add any further reinforcement and if so has anyone else done it?

johnnyj
Rust Hunter
Posts: 220
Joined: 23 Jan 2016 12:12
Location: Northampton
Contact:

Re: Cracks

Postby johnnyj » 08 Jan 2019 20:00

Hi there. I'm really not an expert but I did have to repair this area on my 2L TR7, due to rust in the bulkhead. On removal of the bulkhead section the rear trailing arms were shot.

Others on here will have a better idea, but the rear trailing arm mounts underneath the car are welded to the exterior side of the rear bulkhead. From memory it isn't a double skinned panel so the stresses of the under-car rear trailing arm mounts I am guessing will be transferred to the bulkhead. If the trailing arm mounts move about, I guess those stresses could be transferred to the rear bulkhead panel and hence the cracks.

As I say, I am no expert but if I am right I would want to know why the arm mounts are flexing, causing the transfer of load to the rear bulkhead. Could be corrosion in the mounts under the car, or bushes in the suspension allowing movement?

Just a thought.

Cheers

John
Attachments
P1000918s.jpg
P1000918s.jpg (240.02 KiB) Viewed 7628 times
P1000915s.jpg
P1000915s.jpg (245.86 KiB) Viewed 7628 times
Triumph TR7 FHC, 1977
http://t-r-7.blogspot.co.uk

kstrutt1
Wedge Pilot
Posts: 299
Joined: 15 Jan 2010 14:34
Location:
Contact:

Re: Cracks

Postby kstrutt1 » 08 Jan 2019 20:55

This a photo of the issue, the visible corrosion is only fairly light on the surface but obviously will have thinned it a bit.
Attachments
rps20190104_203126.jpg
rps20190104_203126.jpg (111.52 KiB) Viewed 7622 times
rps20190104_203126.jpg
rps20190104_203126.jpg (111.52 KiB) Viewed 7622 times

saabfast
TRiffic
Posts: 1936
Joined: 03 Feb 2006 08:17
Location: Bexhill-on-Sea

Re: Cracks

Postby saabfast » 09 Jan 2019 12:29

It will be interesting to see it cleaned up with a nice viscous knotted wire brush.
Mine did not have the vertical cracks but the rust line along the bottom seam opened to a 3-4mm slot when cleaned up. The flanges on the rear bulkhead and floorpan where they join were all OK. I cleaned both the top and bottom (underside) with the wire brush, cut a strip of 1mm plate about 25mm wide and tapped it into the seam inside the car. This was then welded all around the slot on the underside (and filled with weld) and all round the inside to the floor and along the seam. It seems to have held without problems for the past 12 years.
Alan
Saab 9-5 2.3t Vector Auto Estate Stage 1
Saab 9-3 2.0 SE Turbo Convertible
'81 TR7 DHC
Image

FI Spyder
TRemendous
Posts: 8910
Joined: 03 Jul 2006 19:54
Location: Canada

Re: Cracks

Postby FI Spyder » 09 Jan 2019 15:36

Yes usually caused by weakened metal due to rust. I would clean out the area down to bare metal to make sure you aren't getting a rosy picture. the thinner the metal to bigger the patch. Also what can happen is the hole the mounting bolt goes through can get elongated. A friend who has a 400 hp Chevy truck V8 in his welded a thick big washer in place (and I think might have used slightly longer bolt) to aid the bracket take the forces without elongating. A lot of force can be put on this area. I don't recall if he reinforced the bracket attach points. He is currently designing and building a dual turbo for it as 400 hp wasn't enough. :P
- - -TR7 Spider - - - 1978 Spitfire- - - - 1976 Spitfire - - 1988 Tercel 4X4 - Kali on Integra - 2013 Volt - Yellow TCT

sonscar
Wedge Pilot
Posts: 488
Joined: 02 Jun 2013 16:09
Location: United Kingdom

Re: Cracks

Postby sonscar » 09 Jan 2019 17:10

See how deep the spot-welded appear,this could be caused by rust between the panel and stiffener.I would cut away the panel and clean up the stiffener and replace the floor and bulkhead as required.Steve

busheytrader
TRemendous
Posts: 3145
Joined: 14 Oct 2007 17:49
Location: United Kingdom
Contact:

Re: Cracks

Postby busheytrader » 10 Jan 2019 02:45

saabfast wrote:It will be interesting to see it cleaned up with a nice viscous knotted wire brush.


I'd attack that metal with the pointy end of a panel beating hammer instead, even where it looks sound as it could be wafer thin underneath. That's what I did to mine on both sides. A few blistering paint spots were just the tip of the iceberg.

I bought one of these for the left and right side https://rimmerbros.com/Item--i-RB7670 and I also hand fabricated strips to replace the bottom 2" of the rear bulkhead and several large patches of the rear floor panel and its trailing edge. Lots of butt welding, not joggled welding for water proof joints, and plug welding where the bulkhead meets the floor. Afterwards lots of zinc rich paint followed by chassis paint then underseal to protect the factory crafted rot traps. My welding wasn't pretty but it was strong and that area's still good 25 years later dealing with the torque of a V8.

There's a short thick U shaped metal strap that's welded underneath each radius arm mount in the factory. After removing them to repair the floor, I made sure I welded them back on to cope with V8 power.

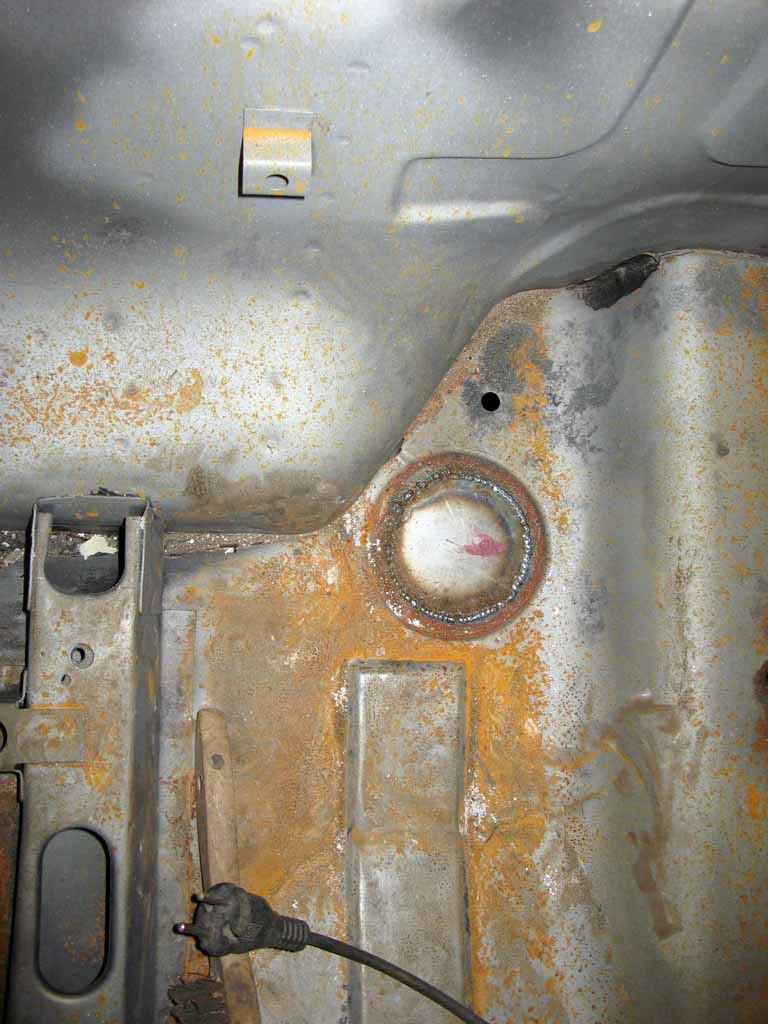
It was my converting to V8 that prompted the bulkhead cracking. I was accelerating hard up a steep local hill shortly afterwards and experienced a pronounced rear end wiggle. Jacking up the rear revealed large horizontal cracks in the rear bulkhead where the metal had thinned. Removing the seats and carpets to effect a repair revealed blisters similar to KSTRUTT sphoto, cutting out the rot completely revealed holes similar to JEREMYJ s.

kstrutt1
Wedge Pilot
Posts: 299
Joined: 15 Jan 2010 14:34
Location:
Contact:

Re: Cracks

Postby kstrutt1 » 10 Jan 2019 22:14

I had a good dig around tonight, the rear couple of inches of the floor have been replaced before (all nicely seam welded in), there are also some small cracks where the parts the trailing arm attaches to the flange on the rear of the floor and the holes the arm bolts through have elongated to slots.

Still can't make any holes but it does look a bit thin so plan is to cut the rear 2
or 3 inches of the floor and bottom 3 or 4 inches of the bulkhead with thicker gauge steel then add reinforcing just about anywhere I can think of!

Beans
TRemendous
Posts: 7770
Joined: 15 Mar 2006 19:29
Location: Netherlands
Contact:

Re: Cracks

Postby Beans » 11 Jan 2019 11:09

I did weld up the big round holes in the floor in all my cars, as it will spread any loads better

Image
Image
1976 TR7 FHC (currently being restored ...)
1980 TR7 DHC (my first car, a.k.a. Kermette)
1981 TR7 FHC (Sprint engined a.k.a. 't Kreng)

http://www.tr7beans.blogspot.com/

kstrutt1
Wedge Pilot
Posts: 299
Joined: 15 Jan 2010 14:34
Location:
Contact:

Re: Cracks

Postby kstrutt1 » 11 Jan 2019 23:17

Set to it with a selection of tools tonight, there was not too much rust which meant I had to cut it appart in loads of small pieces

rps20190111_222131.jpg
rps20190111_222131.jpg (76.37 KiB) Viewed 7505 times


in the end I cut out quite a wide area to give better welding access and make sure all the cracked and distorted metal was gone.
One obvious issue was that the longitudinal member the seat sits on was not welded to the bulkhead (original condition), elsewhere the metal was bit thin and there were some previuos repairs

rps20190111_222111.jpg
rps20190111_222111.jpg (75.07 KiB) Viewed 7505 times


The other problem is the trailing arm bolt hole being elongated by about 15mm here I will turn up a couple of top hat washers to weld in so the bush still has something to clamp onto.
Attachments
rps20190111_222000.jpg
rps20190111_222000.jpg (64.09 KiB) Viewed 7505 times

Hasbeen
TRemendous
Posts: 6474
Joined: 28 Apr 2005 12:32
Location: Australia
Contact:

Re: Cracks

Postby Hasbeen » 13 Jan 2019 02:09

According to my 1977 workshop manual, the bolts that hold the radius rods & trailing arms to their brackets are supposed to have THICK washers under both head & nut. This is obviously to spread the load over the whole bracket, rather than just the bolt hole in the bracket.

If you get a mild clunk from the rear when applying power or lifting off is because those thick washers have been lost over the years & normal washers have been used to replace them.

It took me months to track down the clunking when accelerating or decelerating the 8. After I found this little entry, & checked the 7 to see what was there, I made some thick washers, & eliminated the clunk. They also stop the bolt holes elongating, as the bolt no longer moves.

Hasbeen

busheytrader
TRemendous
Posts: 3145
Joined: 14 Oct 2007 17:49
Location: United Kingdom
Contact:

Re: Cracks

Postby busheytrader » 13 Jan 2019 18:08

That's some serious rust extraction......

On the advice of a guy on the mini forum, I bought one of these.
https://www.silverlinetools.com/en-GB/P ... ame=247820
I was able to straighten the rough cut edges to accept my home made repair panels. Also gets into restricted spaces. Black & Decker made one but I destroyed it pretty quickly. The Silverline item uses proper bearings.

kstrutt1
Wedge Pilot
Posts: 299
Joined: 15 Jan 2010 14:34
Location:
Contact:

Re: Cracks

Postby kstrutt1 » 13 Jan 2019 18:34

I spent last year restoring my range rover classic, and before that my sons morris minor, this is a tiny repair by comparisson!

kstrutt1
Wedge Pilot
Posts: 299
Joined: 15 Jan 2010 14:34
Location:
Contact:

Re: Cracks

Postby kstrutt1 » 10 Feb 2019 21:37

Ive started putting it back together,

Cut out more metal to improve access and welded up a few nicks I had made with the grinder.

rps20190210_155320.jpg
rps20190210_155320.jpg (106.3 KiB) Viewed 7223 times


To get the repair section in it needs to be in 2 pieces, the first and more complex part was made

rps20190210_155423.jpg
rps20190210_155423.jpg (42.17 KiB) Viewed 7223 times


Then welded it in

rps20190210_155505.jpg
rps20190210_155505.jpg (75.24 KiB) Viewed 7223 times


Next up will be to add the second panel then the plan is to link the longitudinal member the seat sits on to the trailing arm mount and add a reinforcing plate underneath.

Stag76
Swagester
Posts: 691
Joined: 22 Jun 2010 04:14
Location: Australia
Contact:

Re: Cracks

Postby Stag76 » 13 Feb 2019 04:06

The longitudinal member that supports the seat is meant to be welded to the bulkhead
to absorb the thrust of the trailing arms when accelerating.

Post Reply

Who is online

Users browsing this forum: No registered users and 117 guests

cron